Saturday, December 5, 2009

Spirals!

I've been experimenting lately with making continuous spirals. The first project was a mini-hat.

(Top view)

If you count the strands knotted on the top you'll find 5 purple and 3 white. Note that the purple spiral is 5 rows high and the white spiral is 3 rows high. This is not a coincidence.


(Side view, inside-out)
I'm showing it to you inside-out so you can see that the yarn does not carry across any rows or columns of stitches; the stripes spiral continuously, all the way to the top, like a barber pole. (I'm not sure if this would qualify as a helix -- I think so but can't say with any degree of authority.)


You might be wondering, if you're knitting a spiral form, how do you start and end? If you look at the candy-cane sock below, which I knit cuff-down, you can see that the cast-on row cuts across the red stripes.

Unlike the baby hat, the stripes don't go all the way to the tip of the toe here. It's possible to do, it's just a pain. For this particular sock, I decided to end the spiral just before the toe. I'll tackle the spiral toe next time.

The image below should give you some idea of the work involved...
Yes those are 12 different strands of yarn that I am working with simultaneously. If you count them you'll find 8 separate balls of white and four red. As with the hat, each strand of yarn corresponds to 1 row on the sock -- only this time, I broke the pattern up into 7 white, 3 red, 1 white, 1 red. The box with the 12-piece separator was a nice way to keep all of the strands separate, while maintaining easy portability of the project. Half-bottle wine box with separator graciously provided by Panther Creek winery.

Allow me also to point you to the work of Sarah-Marie Belcastro, topological graph theorist and uber-expert knitter. She knits her spiral pieces differently than I do -- just another interpretation of the form. She has a new book pending publication which will demonstrate her method. If you're a Raveler, check out her Spiral Bedsocks!

Saturday, November 28, 2009

Cast-On!

JSSBO is in the latest episode of Cast-On! (audio is here)

I'm honored. I'm speechless. Thank you, Brenda!

:)

Wednesday, November 18, 2009

Geeking out with Judy's Magic Rib

Now that I've showed you guys how I do Judy's Magic Cast On, in both knit and purl, you're ready to try alternating them, giving you a ribbed cast-on, which I have affectionately named "Judy's Magic Rib." Judy's Magic Rib is a great way to start mini-moebii which you can use for sock or sweater cuffs, baby hats, etc.

Fundamentally, Judy's Magic Rib breaks down into just four components:

  1. Cast on in knit.
  2. Transition from knit to purl.
  3. Cast on in purl.
  4. Transition from purl to knit.


This post will focus on the Transitions because we have already covered how to cast on in knit and purl in previous posts (here and here). In the transitions, you will:

  1. Bring both strands of yarn through the middle between the two needles, to the other side.
  2. Rotate the yarns one half-twist.
Note that you can do these two sub-steps in either order; this is the order I happen to prefer, and this is what is shown below.

I have to warn you: the kinetics are tricky. You'll be moving two strands of yarn towards you vs. away from you AND rotating in one direction vs. another. It took me *many* attempts to understand how this works. I dearly hope that my efforts to make this technique understandable to you have not been in vain!

The example below is for k2p2 rib.


1. Cast on 2 sts in JMCO-knit.

Start on the bottom needle, end on the top needle. For a refresher on how to do this, click here.


2. Transition from knit to purl.

1. Bring both strands of yarn between the two needles, from back to front. Be careful to not let that last stitch slip off! (It's easier if you first bring the yarns together with your thumb & forefinger, then bring them through the middle.)


2. Rotate the yarns around each other to un-cross them. This is a bit of a pain, because you have to reposition the yarn in your left hand, and switch which finger holds which end of the yarn.


The image below shows this in principle. The three images that follow show how I do it (which you can ignore, if you want to use a different set of movements).

Before I show you how, first I'm going to point out to you that when you're doing JMCO-knit, you hold the tail (red) with your forefinger and the working yarn (black) with your thumb. Whereas when you're doing JMCO-purl, it's the opposite: the working yarn goes on your forefinger, and the tail goes on your thumb. In both cases, the working yarn gets wrapped around the top needle, and the tail gets wrapped around the bottom needle. In theory, if our wrists could rotate another 180 degrees in either direction, it wouldn't matter which finger held which strand, but we humans have our limitations.

So, this is why, when you transition from knit to purl and purl to knit, you have to switch yarn positions.

Hope that makes sense. :)


Here's how I rotate the yarns from JMCO-knit to JMCO-purl...

Note that I used to drop both ends of the yarn, rotate them, and pick them up again. Doing that for each and every transition got old really fast. I eventually figured out this method, which I like a lot better.

(a) With your thumb, let go of the working yarn. Bring your thumb under and behind the working yarn, then up and and in front of the tail.


(b) Now that your thumb is holding the tail, release your forefinger. With your thumb, swing the tail down, behind the working yarn.


(c) Now grab the working yarn with your forefinger, and swing it out.


Transition done! Now you're ready to continue casting on in purl.

3. Cast on 2 purl stitches. Remember how to do this? :) Refresher is here.

With your thumb, throw the tail over the bottom needle by rotating your wrist out, then back.


Throw the working end over the top needle with your forefinger.


(below) You've now cast one purl stitch onto each needle, for a total of three stitches on each needle.


Cast another purl stitch onto each needle, for a total of four stitches.


4. Transition from purl back to knit. (This is the reverse of the transition you did in Step 2.)

1. Bring both yarns between the needles, from front to back. Be sure that last stitch on the top needle doesn't slip off! Bring the strands of yarn together, then through the middle.


2. Rotate the strands of yarn around each other, so that the tail crosses behind the working end. Note that this time you are rotating them in the opposite direction as you did for Step 2.

In principle:


Here's how I rotate the yarns from JMCO-purl to JMCO-knit:

(a) with your forefinger, let go of the working yarn. Bring your forefinger around behind and over the working yarn, then down in front of the tail.

(b) Now that your forefinger has the tail, release your thumb. With your forefinger, swing the tail up and behind the working yarn.


(c) Grab the working end with your thumb, and swing it down.

Congratulations, you've just completed the first repeating segment of Judy's Magic Rib!!!

Now you're ready to cast on more knit stitches. Remember how do to this? :) Refresher is here.

Wrap the tail around the bottom needle...


Bring the working yarn behind the bottom needle and in front of the top needle...


Swing your hand down below the needles...

You now have a total of 5 stitches on each needle.
Cast on one more knit stitch, then transition back to purl, and keep going until you have the number of sts you want on both needles. Then you can continue knitting in a circle (e.g., for toe-up socks), or use one of your needles as a stitch holder and continue knitting in a tube.

Tuesday, November 10, 2009

How I Do Judy's Magic Cast-On...

THIS POST HAS BEEN UPDATED. Please see new updated post here.

How I do Judy's Magic Cast On is a little different. I start on the bottom needle. (I do this with the purl version too, as you may have noticed already).

This is just personal preference.
Cat Bordhi, Wendy Johnson, and Chrissy Gardiner (and probably others) all teach it the same way, starting on the top, but aside from this my method is nearly the same as theirs. Note that their collective method differs a little from the original 2006 publication, with respect to stitch mount (see the *notable word on my JMCO-purl post, for more about that).

I prefer to start on the bottom for a couple of reasons:


  • I personally find it easier to end on the top needle. I think it makes for an easier transition when you turn your work and continue knitting in the round. And if I end on the top, I want to start on the bottom, so I have an equal number of stitches on the needles.
  • Judy’s Magic Rib (which I *will* eventually get around to posting… it’s taken a lot more time than I expected) transitions between knit and purl after a top-needle wrap.

Starting on the bottom means that the first step is different. The other thing about my method that is a little different from Cat/Wendy/Chrissy is that I rotate the yarn around the needles in big circles with my left arm, rather than rotate the needles around the yarn with my right wrist. Trust me, you end up with the same end result. I just find the bigger motion to be more ergonomically friendly.


Bottom-needle starting position:
Wrap the yarn around the bottom needle like so. The working yarn (black) comes over the front of the needle, held securely with your thumb. Hold the tail (red) in back with your forefinger.


Step 1: Wrap the working yarn around the top needle.

This first step is a little tricky (sorry!) but you only have to do it once. You’re going to arc your left hand in a full circle around your needles, and catch the working yarn (black) with your top needle halfway around.

a. Hold both ends of the yarn securely in your left hand, and hold your needles securely in your right. Swing your left hand up above the needles, in a circular motion towards you.


After you swing your hand up, your yarn is going to cross, like this. Note how the tail (red) now comes around the front of the needle from underneath, and crosses behind the working yarn (black).


b. Slip the top needle just above where the yarn crosses.


c. Now bring your hand back down behind both needles to starting hand position, in a circular motion away from you. Note that when you do this, the working yarn (black) will cross over the top needle, and the tail (red) will cross behind the working yarn.

There. You're done with the hard part -- you’ve just made the first stitch on your top needle. You now have one stitch on each needle.


From here out you can ignore the rest of my instructions and follow Cat/Wendy/Chrissy's (but, remember to end with the top needle). Or, keep reading if you want to see how I get the same end result with a different set of motions.


Step 2: Wrap the tail around the bottom needle.

With your forefinger, bring the tail under and in front of the bottom needle, and then slip it behind the top needle.

The result will look like this:


Step 3: Wrap the working yarn around the top needle.

a. With your thumb, bring the working yarn behind the bottom needle, then in front of the top needle. Swing your whole hand up as you do this.

The result will look like this:

b. Now swing your hand back down behind both needles, in a circular motion away from you, back to starting position.

The result will look like this:
You now have two stitches on each of your needles.


At this point, keep repeating steps 2 and 3 until you have the desired number of stitches on your needles. Here’s what it will look like after you do this three more times:

Let's take a closer look:
You can see in the image above that the end result looks the same as stockinette stitch, and that the stitch mount on the top and bottom needles is reversed. This means that when you turn your needles 180 degrees to knit across your bottom needle (pink)...
...you can knit normally. You don't have to do anything special to secure the tail end, and you don't have to knit through any back loops. Just let go of the tail and knit across the red loops with the working yarn. Yay! :)

Monday, November 2, 2009

A Lesson In Humility

There's something about actually drawing the path that yarn makes on a pair of needles that allows me to see just how much I've been overlooking. It is a very humbling experience. But a tremendous learning opportunity -- it's like putting on a pair of glasses, not knowing how badly you need them, and suddenly realizing how much you were missing in the way you were looking at the world before (and yes, I'm speaking from experience there).

Because of some very astute observations one reader (you know who you are) shared with me about my last couple of posts, I thought maybe I was missing something about the way I do Judy's Magic Cast-On, so I dove deeper into the physics and kinetics of this method (you guys are going to see just how much of a nerd I really am). And sure enough, I found some things I hadn't noticed before. Because I am an über-perfectionist, the illustrations aren't quite ready in time for my self-imposed weekly Monday deadline, but they're in progress:

Click to view larger image

(These may also give you some idea as to the process I use to make the illustrations -- a few of you have been asking about that).

So, as I did before when my knitting content wasn't quite ready by Monday, I've uploaded another cute video of my little one to keep you entertained. This one's less than a minute, so do click on it and watch!

Watch it on YouTube

Monday, October 26, 2009

A crash course in illustrating | More on Judy's Magic Cast On

For the past 2 weeks I've left my knitting on the shelf and focused on (a) becoming more fluent with Illustrator, and (b) creating illustrations that would be easy to follow. Specifically, my goal was to have illustrations of Judy's Magic Rib for you this week (see my previous post "Ode to Judy" on this). I got as far as Judy's Magic Cast On in purl. So, I'll finish the illustrations for Judy's Magic Rib next time. Following the illustrations is a philosophical discussion on the purpose for doing this in the first place!


How to do Judy’s Magic Cast-On* in purl:
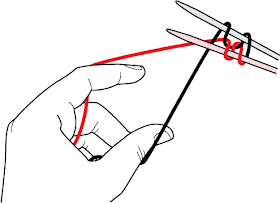
Hold the yarn like so. The black line represents the working end of the yarn; the red line represents the long tail. The working yarn comes up and over the bottom needle and leans to the left.


hands1


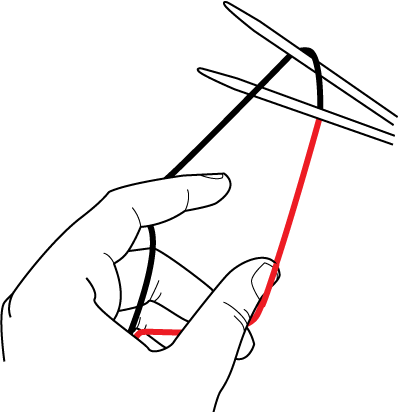
1. With your forefinger, lift the working yarn (black) over and around the top needle, then down and in front of the bottom needle. I'll show this in two steps.


hands1arrow


(1a) First, lift the working yarn over the top needle...


hands2a


(1b) …then down and in front of the bottom needle.

hands2b


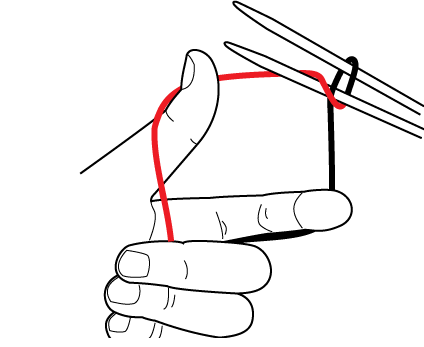
2. Now take your long tail (red), and with your thumb, throw it over the bottom needle and around the working yarn. You'll rotate your wrist out and back to do this. This is also shown in 2 steps.


hands2barrow


(2a) First rotate your wrist out, and with your thumb, throw the tail over the bottom needle...

hands3a


(2b) Then rotate your wrist back in. Note how the tail now crosses in front of the working yarn, on the underside of the bottom needle.


hands3b

Note also that you have one loop around the top needle and one loop around the bottom needle.


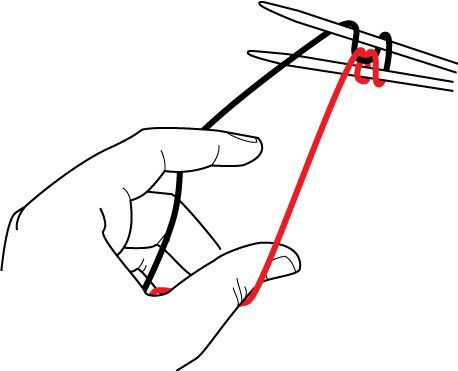
Now repeat step 1 (both a and b). Lift the working yarn over the top needle and bring it down in front of the bottom needle.

hands4

As you pull the working yarn around the top needle, this pulls the tail up from the bottom. You now have two loops around both needles.


Now repeat step 2 (both a and b). Rotate your wrist out, throw the tail over the bottom needle, and rotate your wrist back in.


hands5

You still have 2 loops around both needles. The next time you repeat step 1, you’ll have 3 loops on both needles.


Keep going, and pretty soon you have a group of stitches on your needles:


hands10


------begin philosophical discussion------


Ok so now that you have JMCO-purl on your needles, perhaps you’re wondering why I would bother to figure this out in the first place. Why use JMCO-purl if you can just do JMCO? Well, a couple of reasons...


One, because I wanted to be able to cast on in a rib pattern, so that I could make mini-moebii cuffs for socks, hats, and other small openings (you can use JMCO to start a moebius -- more on that later). Two, because I just plain like taking stuff apart and reverse engineering it.


Ah, and on that note, some of you out there in blogland may notice that my JMCO-purl is not, in fact, the true reverse of the original Judy’s Magic Cast-On, as published in Knitty in 2006. (See my *notable word below for details.) Yes, a very astute observation. Well, as with many things in life, there are multiple ways to do JMCO. And here I would like to take this opportunity to plant a subversive seed in your brains by quoting Judy Becker herself:


“If I did everything the "right" way, I never would have invented JMCO. And if Cat had actually followed the JMCO instructions, it probably would have been years before I realized that it doesn't really matter which way you wind the yarn around the needles - the magic is in the middle (sort of like Voodoo Donuts). So strike those words from your knitting vocabulary!”


Yay Judy! Subtext: don’t assume you have to follow the instructions (yes, even my instructions) to come up with something that works for you!


------end philosophical discussion------


*A notable word about JMCO and stitch mount:
Normally when knitting or purling, the stitches are wrapped around your left needle leading with the front leg. Take a closer look at the last illustration and you will notice that the black loops on the top needle do just that; they lead with the front. Whereas the red loops on the bottom needle lead with the back leg. This is on purpose, and this is where my method diverges from what would be the reverse of the original JMCO.


mount2


Why does this matter? Well, say you’re starting a toe-up sock. After you cast on your stitches, you’re going to rotate your needles 180 degrees clockwise and work across the red stitches. See what happens as you turn the work 180 degrees?


mount2u-d

The red loops, now on the top needle, change orientation and lead with the front leg, and the black loops, now on the bottom needle, lead with the back leg. Work across the row of red stitches as you normally would, then rotate clockwise again, and the black loops would once again lead with the front leg. Magic!