For the past 2 weeks I've left my knitting on the shelf and focused on (a) becoming more fluent with Illustrator, and (b) creating illustrations that would be easy to follow. Specifically, my goal was to have illustrations of Judy's Magic Rib for you this week (see my previous post "Ode to Judy" on this). I got as far as Judy's Magic Cast On in purl. So, I'll finish the illustrations for Judy's Magic Rib next time. Following the illustrations is a philosophical discussion on the purpose for doing this in the first place!
How to do Judy’s Magic Cast-On* in purl:
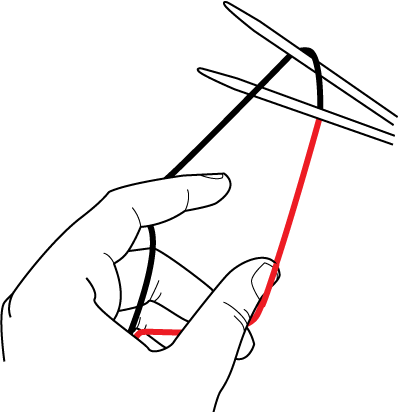
Hold the yarn like so. The black line represents the working end of the yarn; the red line represents the long tail. The working yarn comes up and over the bottom needle and leans to the left.

1. With your forefinger, lift the working yarn (black) over and around the top needle, then down and in front of the bottom needle. I'll show this in two steps.

(1a) First, lift the working yarn over the top needle...

(1b) …then down and in front of the bottom needle.

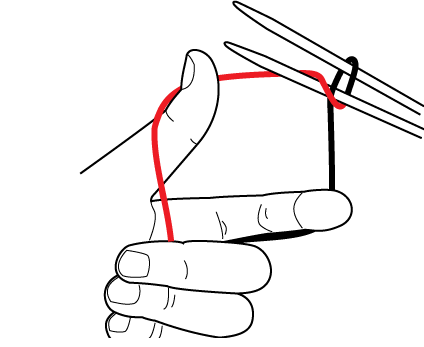
2. Now take your long tail (red), and with your thumb, throw it over the bottom needle and around the working yarn. You'll rotate your wrist out and back to do this. This is also shown in 2 steps.

(2a) First rotate your wrist out, and with your thumb, throw the tail over the bottom needle...

(2b) Then rotate your wrist back in. Note how the tail now crosses in front of the working yarn, on the underside of the bottom needle.

Note also that you have one loop around the top needle and one loop around the bottom needle.
Now repeat step 1 (both a and b). Lift the working yarn over the top needle and bring it down in front of the bottom needle.

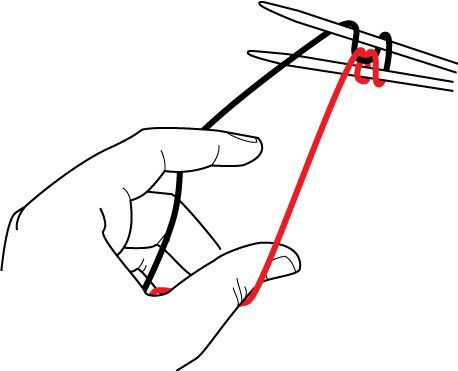
As you pull the working yarn around the top needle, this pulls the tail up from the bottom. You now have two loops around both needles.
Now repeat step 2 (both a and b). Rotate your wrist out, throw the tail over the bottom needle, and rotate your wrist back in.

You still have 2 loops around both needles. The next time you repeat step 1, you’ll have 3 loops on both needles.
Keep going, and pretty soon you have a group of stitches on your needles:

------begin philosophical discussion------
Ok so now that you have JMCO-purl on your needles, perhaps you’re wondering why I would bother to figure this out in the first place. Why use JMCO-purl if you can just do JMCO? Well, a couple of reasons...
One, because I wanted to be able to cast on in a rib pattern, so that I could make mini-moebii cuffs for socks, hats, and other small openings (you can use JMCO to start a moebius -- more on that later). Two, because I just plain like taking stuff apart and reverse engineering it.
Ah, and on that note, some of you out there in blogland may notice that my JMCO-purl is not, in fact, the true reverse of the original Judy’s Magic Cast-On, as published in Knitty in 2006. (See my *notable word below for details.) Yes, a very astute observation. Well, as with many things in life, there are multiple ways to do JMCO. And here I would like to take this opportunity to plant a subversive seed in your brains by quoting Judy Becker herself:
“If I did everything the "right" way, I never would have invented JMCO. And if Cat had actually followed the JMCO instructions, it probably would have been years before I realized that it doesn't really matter which way you wind the yarn around the needles - the magic is in the middle (sort of like Voodoo Donuts). So strike those words from your knitting vocabulary!”
Yay Judy! Subtext: don’t assume you have to follow the instructions (yes, even my instructions) to come up with something that works for you!
------end philosophical discussion------
*A notable word about JMCO and stitch mount:
Normally when knitting or purling, the stitches are wrapped around your left needle leading with the front leg. Take a closer look at the last illustration and you will notice that the black loops on the top needle do just that; they lead with the front. Whereas the red loops on the bottom needle lead with the back leg. This is on purpose, and this is where my method diverges from what would be the reverse of the original JMCO.
Why does this matter? Well, say you’re starting a toe-up sock. After you cast on your stitches, you’re going to rotate your needles 180 degrees clockwise and work across the red stitches. See what happens as you turn the work 180 degrees?

The red loops, now on the top needle, change orientation and lead with the front leg, and the black loops, now on the bottom needle, lead with the back leg. Work across the row of red stitches as you normally would, then rotate clockwise again, and the black loops would once again lead with the front leg. Magic!


awesome illos! i Know that the bezier tool is meant to get easier, but i lack the patience.
ReplyDeleteBrilliant. And darn fine Illustrator work!
ReplyDeleteMe? i always knit they some golf--I play it (work it) as it lays.
ReplyDeleteIt takes some time (and practice) to be able to read your knitting--its worth making the effort to learn to do this. then you can work any stitch as it is.
(and now, i can also knit any stitch to orient it on the needle as i desire.. most often, 'reverse mounted (since i am a combo knitter) but sometimes i'll work stitches standard (and then i can decrease LEFT or Right by knitting 2 tog. and i can work knit stitches 'backwards too--so decreasing on stocking knit worked in the round is easier to.
Knitting keeps me young--i am always learning new ways to do things.
(add for me? i just use a standard JMCO and work the purl side from the get go (turn the knitting upside down/inside out!) i don't bother to work it differently!)
WOW! Just Wow! This is exactly what I've been trying to figure out! Your illustrations are perfect! I need to learn this for a center-out shawl collar in ribbing since everything I've tried puts a row of stockinette between the needles. When I try to ladder down and purl that stitch, I end up with a huge hole. Your rib version of JMCO is the answer! As clear as your illustrations are, though, I admit I'm a slow learner and a video would be help me get the hang of it faster. Are you going to add one? Do you know of an existing video that would be a good supplement to your instructions? Thank you so much for writing such a useful blog!
ReplyDelete