Not baby booties -- baby
boobies!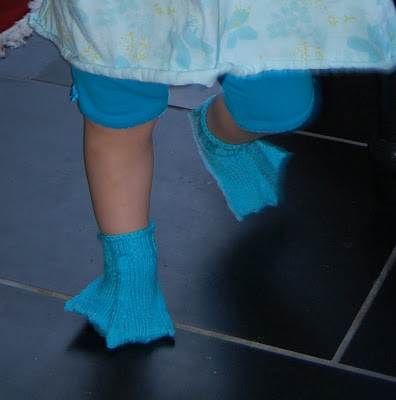
This post outlines the pattern for the toddler version of "
Duck," published recently in Knitty.
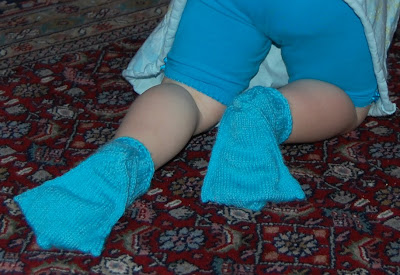
I chose to model these socks after the blue-footed booby, since my husband loves the Galapagos and is a huge fan of this bird. You may of course choose your own inspiration when choosing your color. When my daughter outgrows these, maybe I'll make her some pink flamingo feet.
I also wanted to mention, just in case you are concerned about one possible disadvantage of hand-knitted socks for new walkers...
Fortunately for me, knitters are some of the cleverest and most creative people I know, and the fine folks at the Fiber Gallery on Phinney Ridge suggested I use fabric paint to add a little traction to the bottom. Thank you Fiber Gallery!

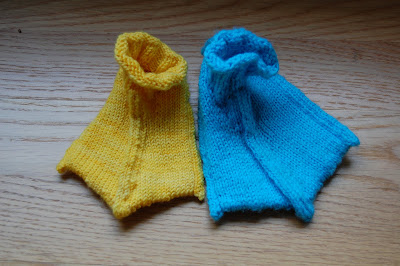
Some of you may notice that this sock does not correspond
exactly to the pattern below. Specifically, I decided to try moving the decreases to the outer edges, so I would have vertical rows along the bottom. But in retrospect, I like it better with the decreases down the middle.
As always, I encourage you to thumb your nose at my instructions and play around with your own ideas.
The GistThe booby sock pattern is very similar to the duck sock pattern. Stitch count and directions are the same, with the following exceptions:
- Use a slightly thicker yarn, and larger needles.
- Do not purl the center stitch on the bottom of the sock -- knit all the way across.
- End the center toe at the tip, where you cast on, rather than wrapping around and working to the back of the heel.
- Since you are not working the center toe along the bottom, you will end up with 6 live I-cord sts, rather than 9, to be slipped onto a 3rd needle and then onto the same holder as the heel sts.
Other than that, it's the same.
The DetailsI recommend that you reference the Knitty article
Duck while making these socks, as it contains photos and illustrations of the process. The booby socks are so similar in structure to the duck socks, once you understand the gist of how they are different, you probably won't even need the instructions below. Differences between this pattern and Duck are indicated by
bold red type.MATERIALS
YarnBaby Ull by Dale of Norway [100% superwash wool; 175m per 50g skein]; color: #6714 Blue; 1 skein
NeedlesTwo US
#3/3.25mm circular needles, 24 inches or longer, or one needle of sufficient length for Magic Loop.
(Note: this pattern was developed for circulars, but if you are devoted to your dpn's, may I suggest you check out this video tutorial, kindly posted by Mojen.) One set US
#3/3.25mm double-point needles (you’ll need only two or three of them)
Notions Crochet hook, close in size to US #
3/3.25mmSmall stitch holders
Tapestry needle
Elastic thread (optional, but a good thing if your toddler likes to pull her socks off)
GAUGE
28 sts/40 rows = 4" in stockinette st
Gauge makes a noticeable difference in size!
PATTERN NOTES
Please see Knitty.com for references to
standard abbreviations.
This pattern also uses:
Non-standard abbreviations (these techniques are known by a couple of different names)
- RLI (Right Lifted Increase): Use the right needle to pick up the stitch below the next stitch on the left needle. Place it on the left needle, then knit into it. 1 stitch has been increased.
- LLI (Left Lifted Increase): Use the left needle to pick up the stitch 2 rows below the last stitch on the right needle. Knit into this stitch. 1 stitch has been increased.
- S2KP: Slip next 2 sts together, knitwise, as if to work a k2tog. Knit next st, then pass both slipped sts together over st just knit. This forms a centered double decrease.
DIRECTIONS
Note that a semicolon ";" indicates the halfway mark, where you change to your second circular needle. Differences between this pattern and the original are indicated by bold red type.
Shape Center Point
Using Judy's Magic Cast On, CO 4 sts (2 sts on each needle).
Round 1: [K1, yo, k1] on each needle. 6 sts.
Round 2: CO 2 sts (1 st on each needle), k2 (first st to be knit is new CO st), p1, k1; CO 2 sts (1 st on each needle), k5. 10 sts.
Round 3: CO 2 sts (1 st on each needle), k3, p1, k2; CO 2 sts (1 st on each needle), k7. 14 sts.
Shape Webbing
Round 4: CO 4 sts (2 sts on each needle), k5, p1, k3; CO 4 sts (2 sts on each needle), k11. 22 sts. Round 5: CO 8 sts (4 sts on each needle), k9, p1, k5; CO 8 sts (4 sts on each needle), k19. 38 sts. Round 6: CO 12 sts (6 sts on each needle, k15, p1, k9; CO 12 sts (6 sts on each needle, k31. 62 sts.
Round 7: K15, p1, k15; k31.
Begin Side Toes
Round 8: YO, k15, p1, k15; YO, k31. 64 sts.
Rounds 9-11: [P1, k15] twice; p1, k31.
Shape Foot
Round 12: P1, k13, k2tog, p1, ssk, k13; P1, k13, k2tog, k1, ssk, k13. 60 sts.
Rounds 13-15: [P1, k14] twice; p1, k29.
Round 16: P1, k12, k2tog, p1, ssk, k12; P1, k12, k2tog, k1, ssk, k12. 56 sts.
Rounds 17-19: [P1, k13] twice; p1, k27.
Round 20: P1, k11, k2tog, p1, ssk, k11; P1, k11, k2tog, k1, ssk, k11. 52 sts.
Rounds 21-23: [P1, k12] twice; p1, k25.
Round 24: P1, k10, k2tog, p1, ssk, k10; P1, k10, k2tog, k1, ssk, k10;. 48 sts.
Rounds 25-27: [P1, k11] twice; p1, k23.
Round 28: P1, k9, k2tog, p1, ssk, k9; P1, k9, k2tog, k1, ssk, k9. 44 sts.
Rounds 29-30: [P1, k10] twice; p1, k21.
Gusset
Round 1: P1, k8, LLI, k2, p1, k2, RLI, k8; p1, k8, k2tog, k1, ssk, k8. 44 sts: 24 sts on first needle, 20 sts on second needle.
Rounds 2-3: [P1, k11] twice; p1, k19.
Round 4: P1, k8, LLI, k3, p1, k3, RLI, k8; p1, k7, k2tog, k1, ssk, k7. 44 sts: 26 sts on first needle, 18 sts on second needle.
Round 5-6: [P1, k12] twice; p1, k17.
Round 7: P1, k8, LLI, k4, p1, k4, RLI, k8; p1, k6, k2tog, k1, ssk, k6. 44 sts: 28 sts on first needle, 16 sts on second needle.
Rounds 8-9: [P1, k13] twice; p1, k15.
Round 10: P1, k8, LLI, k11, RLI, k8; p1, k5, k2tog, k1, ssk, k5. 44 sts: 30 sts on first needle, 14 sts on second needle. Note that center st on first needle is knit, instead of purled.
Heel
Work first 9 sts of first needle in pattern; place next 13 sts on st holder for instep. Turn work so that WS is facing. Heel flap will now be worked back and forth in rows over remaining 31 sts. When working first row, work all sts onto one needle.
Row 1 [WS]: P8, k1, p13, k1, p8.
Row 2 [RS]: K8, p1, k4, k2tog, k1, ssk, k4, p1, k8. 29 sts.
Row 3 [WS]: P8, k1, p11, k1, p8.
Row 4 [RS]: K8, p1, k3, k2tog, k1, ssk, k3, p1, k8. 27 sts.
Row 5 [WS]: P8, k1, p9, k1, p8.
Row 6 [RS]: K8, p1, k2, k2tog, k1, ssk, k2, p1, k8. 25 sts.
Row 7 [WS]: P8, k1, p7, k1, p8.
Row 8 [RS]: K8, p1, k1, k2tog, k1, ssk, k1, p1, k8. 23 sts.
Row 9 [WS]: P8, k1, p5, k1, p8.
Row 10 [RS]: K8, p1, k2tog, k1, ssk, p1, k8. 21 sts.
Row 11 [WS]: P8, k1, p3, k1, p8.
Row 12 [RS]: K8, p1, S2KP, p1, k8. 19 sts.
Row 13 [WS]: P8, k1, p1, k1, p8.
Break yarn.
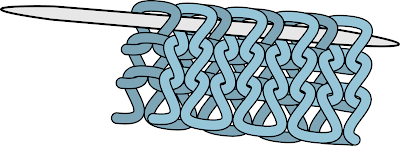
Now you will rearrange the sts so that they fit together like a zipper. The diagrams below show how to do this in general; you can apply these principles to your stitch total (19).
With RS facing, divide remaining sts between 2 needles, placing first 9 sts (represented by medium blue) on right needle and last 10 sts (light blue) on left needle.
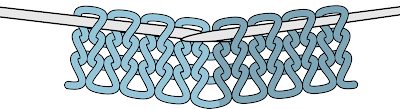
Follow the steps below to slip sts to a holder or third needle, alternating 1 stitch from each needle as you go.
Fold fabric in half so that the left needle is in front of the right needle.
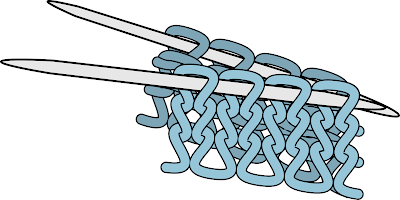
Slip 1 stitch purlwise from left/front needle to third needle.
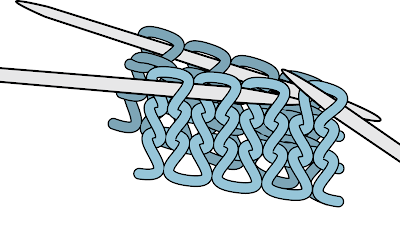
Slip 1 stitch purlwise from right/back needle to third needle.
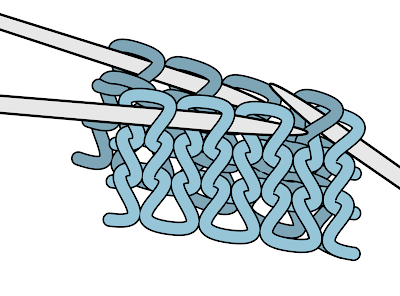
Repeat steps 2 and 3 until you have transferred all sts to your third needle.
In the case of your sock, since you are working this section over an odd number of sts (this example shows an even number of sts), your result would begin
and end with the sts from your left/front needle.
Leave these sts on their holder until you have finished the toes. At that point, you'll bind these sts together with applied I-cord.
ToesToes are worked in applied I-cord. Cords will be worked along columns of purl sts which run along top and sides of foot.
Please see Duck in knitty.com for detailed instructions on working the toes. This blog post focuses only on finishing the toes.
Work center toe first. Start and work over top of foot as described in Duck, then when you come to the tip of the webbing, work one more row without picking up any sts from the foot. Bind off and weave in ends. The idea here is, you want it to stick out just a little bit.
Work either of the side toes next, exactly as described in Duck. When you come to the stopping point of your first side toe, place the 3 live sts on holder and break yarn.
When you come to the stopping point on your next side toe, do not break the yarn -- this is now your working yarn.
As you did with the heel sts, place the 3 sts from each toe onto 2 separate needles, and then slip each stitch onto a third needle, alternating side to side like a zipper. You can start from either toe.
After you have slipped 3 sts onto your third needle, grab the working yarn (it doesn't matter if it's from the right toe or left toe), bring it between the two needles and then behind the third needle. Then slip the last 3 sts to the third needle. (I’m working on a diagram for this.) Your working yarn should emerge from the back, between the 3rd and 4th sts.
Slip these 6 sts purlwise onto the same holder/dpn that has been holding your heel sts. You should now have a total of 25 sts on the holder.
Close Back of HeelHeel will be closed by working applied I-cord, continuing from the side toes.
Next Row: K2, k2tog tbl. Sl sts purlwise back to left needle.
Repeat this row until all sts have been worked. 3 sts remain.
CuffContinuing from I-cord sts just worked, pick up and k 9 sts along upper edge of opening, k held sts of instep, pick up and k 9 sts along upper edge of opening. 34 sts.
Next Round: *K3, p2, [k2, p2] three times; repeat from * once.
Repeat this round 15 times more, or until cuff is desired length.
K 2 rounds. BO all sts using Jeny's Surprisingly Stretchy Bind Off.
FINISHING
Weave in ends. If desired, sew elastic thread through inside of cuff.


