Now that I've showed you guys how I do Judy's Magic Cast On, in both knit and purl, you're ready to try alternating them, giving you a ribbed cast-on, which I have affectionately named "Judy's Magic Rib." Judy's Magic Rib is a great way to start mini-moebii which you can use for sock or sweater cuffs, baby hats, etc.
Fundamentally, Judy's Magic Rib breaks down into just four components:- Cast on in knit.
- Transition from knit to purl.
- Cast on in purl.
- Transition from purl to knit.
This post will focus on the Transitions because we have already covered how to cast on in knit and purl in previous posts (here and here). In the transitions, you will:
- Bring both strands of yarn through the middle between the two needles, to the other side.
- Rotate the yarns one half-twist.
Note that you can do these two sub-steps in either order; this is the order I happen to prefer, and this is what is shown below. I have to warn you: the kinetics are tricky. You'll be moving two strands of yarn towards you vs. away from you AND rotating in one direction vs. another. It took me *many* attempts to understand how this works. I dearly hope that my efforts to make this technique understandable to you have not been in vain!
The example below is for k2p2 rib.
1. Cast on 2 sts in JMCO-knit.
Start on the bottom needle, end on the top needle. For a refresher on how to do this, click here.
2. Transition from knit to purl. 1. Bring both strands of yarn between the two needles, from back to front. Be careful to not let that last stitch slip off! (It's easier if you first bring the yarns together with your thumb & forefinger, then bring them through the middle.)

2. Rotate the yarns around each other to un-cross them. This is a bit of a pain, because you have to reposition the yarn in your left hand, and switch which finger holds which end of the yarn.
The image below shows this in principle. The three images that follow show how I do it (which you can ignore, if you want to use a different set of movements).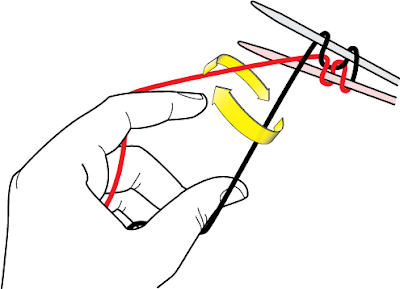
Before I show you how, first I'm going to point out to you that when you're doing JMCO-knit, you hold the tail (red) with your forefinger and the working yarn (black) with your thumb. Whereas when you're doing JMCO-purl, it's the opposite: the working yarn goes on your forefinger, and the tail goes on your thumb. In both cases, the working yarn gets wrapped around the top needle, and the tail gets wrapped around the bottom needle. In theory, if our wrists could rotate another 180 degrees in either direction, it wouldn't matter which finger held which strand, but we humans have our limitations.
So, this is why, when you transition from knit to purl and purl to knit, you have to switch yarn positions.
Hope that makes sense. :)
Here's how I rotate the yarns from JMCO-knit to JMCO-purl...
Note that I used to drop both ends of the yarn, rotate them, and pick them up again. Doing that for each and every transition got old really fast. I eventually figured out this method, which I like a lot better.
(a) With your thumb, let go of the working yarn. Bring your thumb under and behind the working yarn, then up and and in front of the tail.

(b) Now that your thumb is holding the tail, release your forefinger. With your thumb, swing the tail down, behind the working yarn.

(c) Now grab the working yarn with your forefinger, and swing it out.

Transition done! Now you're ready to continue casting on in purl.
3. Cast on 2 purl stitches. Remember how to do this? :) Refresher is here.
With your thumb, throw the tail over the bottom needle by rotating your wrist out, then back.

Throw the working end over the top needle with your forefinger.

(below) You've now cast one purl stitch onto each needle, for a total of three stitches on each needle.
Cast another purl stitch onto each needle, for a total of four stitches.
4. Transition from purl back to knit. (This is the reverse of the transition you did in Step 2.)
1. Bring both yarns between the needles, from front to back. Be sure that last stitch on the top needle doesn't slip off! Bring the strands of yarn together, then through the middle.

2. Rotate the strands of yarn around each other, so that the tail crosses behind the working end. Note that this time you are rotating them in the opposite direction as you did for Step 2.
In principle:
Here's how I rotate the yarns from JMCO-purl to JMCO-knit:
(a) with your forefinger, let go of the working yarn. Bring your forefinger around behind and over the working yarn, then down in front of the tail. 
(b) Now that your forefinger has the tail, release your thumb. With your forefinger, swing the tail up and behind the working yarn.

(c) Grab the working end with your thumb, and swing it down.
Congratulations, you've just completed the first repeating segment of Judy's Magic Rib!!!
Now you're ready to cast on more knit stitches. Remember how do to this? :) Refresher is here.
Wrap the tail around the bottom needle...

Bring the working yarn behind the bottom needle and in front of the top needle...

Swing your hand down below the needles...

You now have a total of 5 stitches on each needle.
Cast on one more knit stitch, then transition back to purl, and keep going until you have the number of sts you want on both needles. Then you can continue knitting in a circle (e.g., for toe-up socks), or use one of your needles as a stitch holder and continue knitting in a tube.
 If you count the strands knotted on the top you'll find 5 purple and 3 white. Note that the purple spiral is 5 rows high and the white spiral is 3 rows high. This is not a coincidence.
  I'm showing it to you inside-out so you can see that the yarn does not carry across any rows or columns of stitches; the stripes spiral continuously, all the way to the top, like a barber pole. (I'm not sure if this would qualify as a helix -- I think so but can't say with any degree of authority.)
  Unlike the baby hat, the stripes don't go all the way to the tip of the toe here. It's possible to do, it's just a pain. For this particular sock, I decided to end the spiral just before the toe. I'll tackle the spiral toe next time.
 Yes those are 12 different strands of yarn that I am working with simultaneously. If you count them you'll find 8 separate balls of white and four red. As with the hat, each strand of yarn corresponds to 1 row on the sock -- only this time, I broke the pattern up into 7 white, 3 red, 1 white, 1 red. The box with the 12-piece separator was a nice way to keep all of the strands separate, while maintaining easy portability of the project. Half-bottle wine box with separator graciously provided by Panther Creek winery.


.png)


