Showing posts with label moebius. Show all posts

Saturday, August 7, 2010

Mobebius Cast On: the way I do it

A well-known way to cast on a moebius is Cat Bordhi's method. This is the first one I learned, and it served me well for many a moebius. But, true to my nature, I eventually got curious about other possibilities. After a litte web research and some playing around on my own, I found that there are, in fact, many ways to start a moebius. In this post, I'll show you my (current) favorite way to do this.

I spent some time deconstructing Cat's method, and found that it was very similar to the classic looping provisional cast on, the key difference being that you're looping your working yarn around the cable, rather than a length of waste yarn. Kinetically, these methods are very different, but the end result is quite similar. This gave me the idea to try to adapt other provisional cast ons for moebius purposes.

The method described below is adapted from the Turkish Cast On, commonly used for casting on toe-up socks. Turkish cast on is about as simple as you get -- it's just a continuous series of wraps around 2 needle tips. But it gets a little tricky when you adapt it to a moebius. Instead of just holding onto the yarn and wrapping it around and around, you are wrapping it around a cable ring, so you have to reposition your hand with each wrap. But despite this little inconvenience, I find it's the easiest and friendliest moebius cast on.

Start with a 40" cable needle.

Step 1
Tie a slip knot into the end of the yarn, and place it on your R needle.
Loop the cable around, and lay it in front of the knot and the working yarn.
Hold the yarn behind the needle and cable.

It should look like this:
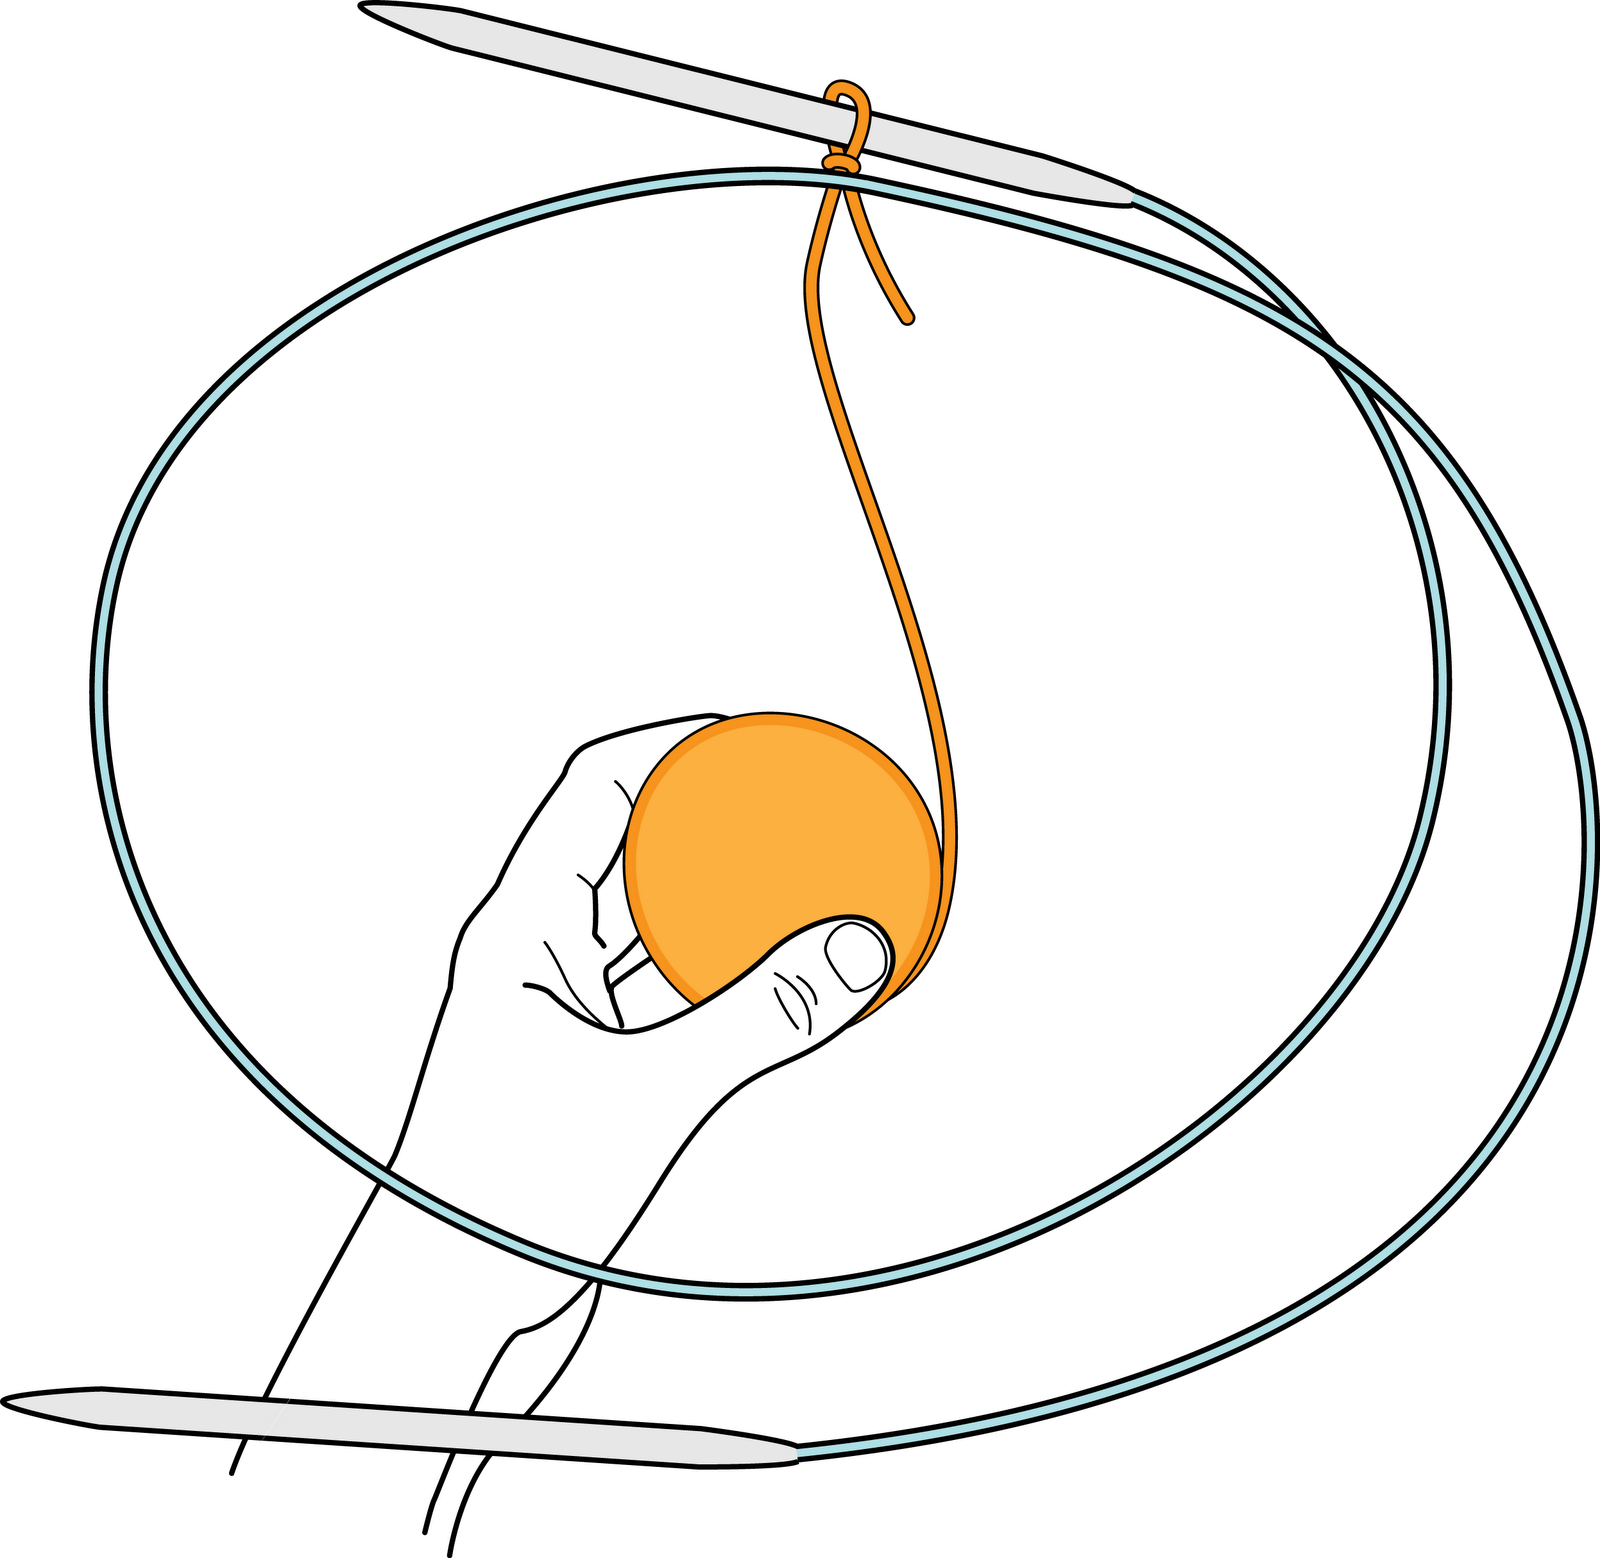


Step 2
Release the yarn and move your hand around to the front of the cable.


Step 3
Grasp the ball of yarn from the front of the cable.


Step 4
Holding the yarn, bring your hand above the needle.


Step 5
Bring your hand back down below the needle. Yarn now wraps around the needle and cable.
This is your first Moebius stitch. When counting sts for final width, count this wrap as one stitch.


Repeat steps 2-5 to make more wraps. As you continue to wrap, slide your cast-on stitches to the right, so they slide off the R needle and onto the cables.

By the way, as you slide your wraps onto the cables, do not pull out the extra slack. The wraps need to be loose enough to slide around and onto your other needle.

When you’ve cast on enough sts to go all the way around your cable needle, your work should look something like this. Place a stitch marker on your right needle to indicate your starting point. Work the first stitch on the L needle, indicated with the arrow.

With your stitch marker in place, work the first stitch on the L needle and continue around.

Notice how your slipknot is now on the cable. It started out on the R needle, and as you continued to cast on your moebius stitches, it moved clockwise around your cable to this position.

After you’ve worked all the cast on stitches (once around, or half of 1 moebius round), your slipknot will be on the tip of your L needle, and your stitch marker will be on the cable. Pretty cool, eh?

So, now you know how I like to do it. But if you, like me, are still curious about other ways to cast on for your moebius, here are some links you might find interesting.
Toroidal Snark - sarah-marie belcastro describes a variety of ways for casting on.
Iris Schreier's moebius cast on - video demonstrating an alternative way of casting on -- the result is kindof like Judy's Magic Cast On a-la-moebius.

Monday, October 12, 2009

Ode to Judy

There once was a knitter named Judy
And one day, while sick and all woozy,
She made up a trick
It's really quite slick
It's a cast-on, and it is a beauty.

In the Spring of 2006,
Judy Becker published her Magic Cast-On in Knitty.com. Sock knitters around the world quickly adopted this ingenious technique and applied it to toe-up socks.

But what about other ways to use JMCO? And other patterns, besides stockinette stitch?

After I learned how to do Judy's Magic Cast-On, I adapted it to a rib pattern. This is useful for all kinds of things -- but mostly I use it to make mini-moebii.


This little guy, for instance, is the perfect size for making baby socks. (Yes, that's
Jeny's Surprisingly Stretchy Bind-Off at the edge.)


My latest video walks you through doing the traditional JMCO, reverse JMCO (i.e., purl), and JMCO Rib -- which, with Judy's permission, I have affectionately named "Judy's Magic Rib."


(watch it on
YouTube)


In the video I show two strands of yarn tied together in a knot. This is just for visual reference so you can more easily see which end is the working yarn (purple) and which is the non-working, or tail, end of the yarn (red). Normally Judy's Magic Cast-On is done with a single strand of yarn -- in fact, that's what's so great about it!

Note that Judy's Magic Rib will always have a visible half-stitch shift at the cast-on row. I happen to think this is an endearing feature, but I know Judy doesn't love it.


Thank you Judy for sharing your ingenious cast-on with all of us!

Below are some images that I hope will clarify the process of doing JMCO-purl. You need to get comfortable with this before you can master Judy's Magic Rib. (10/23 Addendum: Note that the exact method here shown for starting JMCO-purl is a little different from what I show in a later post, "A crash course in Illustrator." The newer one is better!)

1. Put the yarn around the bottom needle with the ends coming toward you, the non-working end (red) coming over the top. Get ready to swing the working (purple) yarn up with your forefinger so it crosses in front of the non-working (red) end.


2. With your forefinger, continue upwards; swing the working (purple) yarn up and over the top needle, bringing it back through between the needles.


3. With your thumb, grab the non-working (red) yarn...
(The working yarn is now IN FRONT of the bottom needle -- sorry this is a bit obscured in the photo).


... and swing it in front of the working (purple) yarn, and up and over the bottom needle.


4. After you swing the non-working (red) yarn over the needle, rotate your hand clockwise.


5. After you have rotated, use your forefinger to bring the working (purple) yarn up, over, and between the needles.


6. Then, as in step 3, grab the non-working (red) yarn with your thumb and bring it in front of the working yarn, and over the bottom needle.


You now have two stitches on your needles. From here, continue from step 4 (in which you rotate your hand).


Hope this helps to clarify Judy's Magic Cast-On in purl. Stay tuned for written instructions for Judy's Magic Rib!

Sunday, October 4, 2009

Is there a topologist in the house?

Seriously. Because I would really like to know what is the proper name for this form:
It's a double-knit moebius. But what's the mathematical name of this thing? It's got a half-twist, so it must be a moebius. But it has an inside and an outside, which means it has volume, so it can't be a moebius. So what is it? (My best guess: some kind of twisted toroidal form). If there are any topologists out there reading this, I hope you know the answer, and that you will let me know.

Here is my latest video, which explores these topics.
(View in YouTube).

Here's where this saga began...

Once upon a time I learned from Cat Bordhi's book A Treasury of Magical Knitting how to knit a moebius. Pretty cool. Then I heard through the grapevine that Judy Becker had made a doubleknit moebius, which naturally made me want to try to make my own. Only I wanted mine to be continuous, with no insertion point. The image above is what I came up with. The red crochet chain shows where the stitches came off the needles.

While I was knitting it, I was vastly curious what I would end up with if I bound off the edges separately and unfurled it, instead of grafting the edges together. So, here's what you get if you pull off the crochet chain...


Pull the sides apart...


Untwist, and voilá!
To my complete surprise, I found it to be the *exact same* form that you get if you cut an ordinary moebius down its center axis: a tube with 720 degrees (2 full turns) of twist.

Ergo, you can take this form and re-shape it into an ordinary moebius (note how the knit and the purl sides meet in the middle here):


I don't know about you but I thought, oh man, this is way cool!!

If you stuff the closed form to give it some volume, you get this:


Note how the half-twist goes away as it gains volume, and instead you get a spiral running through the middle. Awesome!


I've continued to explore this topic and found that there are yet more ways to create a doubleknit moebius, some of which may surprise you. Stay tuned...