I’m in the middle of several unfinished projects that are not ready for blogging. But I do have a little ditty to share about Adobe Illustrator. This post might be useful if you are interested in learning how to make your own knitting illustrations, and it assumes you have working knowledge of Illustrator. Please see my previous post on this topic, "Knitting with Illustrator," for more on this.
Many thanks to Lindsay (Ravelry ID = lynzele) for sending along this extremely helpful tip!
Have you ever noticed the Appearance window in Illustrator? Little did I know the power of this tab…

If you’ve read my blog post "Knitting with Illustrator," you know that I was creating an outlined path of yarn by
- drawing a curve,
- copying that curve,
- pasting the copy behind the first curve, and
- changing the color and increasing the stroke width of the copy.
This meant that for every segment of the yarn path, I had two objects in the Layers window. There are a LOT of yarn segments. Getting them all into the right order was a downright pain in the ass.
Thanks to Lindsay, I now know I can cut the number of objects in half, because of the option to duplicate the path in the Appearance window:
Now I can draw a path, duplicate it in the Appearance window, and I still have only one object in the layer.
(Click on any photo below to enlarge)
I can even give different properties to the two different strokes of the object. The image below shows a duplicate path in which the thicker black stroke has butt caps, and the thinner pink stroke has rounded caps.
So, here’s a little exercise. Let’s draw an overhand knot using our newfound knowledge of this feature. If you were to take a piece of rope and tie a simple overhand knot, it should look like this:
If I draw the path of this knot with the pen in Illustrator, it should look like this below:
In order to make the Illustrator path look like a knot, some portions will have to move forward, and other portions will have to move back. Illustrator doesn’t let you weave a single path the way you can weave a physical piece of rope (alas), so you’ll have to copy segments of the path and layer them in order.
First, increase the width of the stroke so it’ll look more like a knot, and less like a thin pretzel. Then, in the Appearance window (lower right), click on Duplicate.
With the top stroke in the Appearance window highlighted, and the path selected, change the color of the top stroke. Let’s make it hot pink…
Now decrease the width of the top stroke. You can make this change in the Stroke window (right above Appearance in this screen). In this case, decreasing the pink by 1 point looks right for depicting an outline.
Using the direct selection tool, click on the curved segment on the left side of the knot. The handles in the image below indicate which path segment is selected.
Now copy the segment (Ctrl-C) and paste it in front (Ctrl-F). The image below shows these commands in the Edit menu, in case you are not a shortcut-junkie like me.
Now select the path segment that runs through the middle-left.
Paste this segment in front. Note that the new segment will be on top of the main path, but will be below the first path segment you created.
The Layers window might be an easier way to see the order in which the paths sit on top of each other. See that little blue square? That indicates which path is active -- in this case, the middle-left segment in the image above.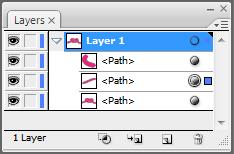
Repeat this process with the last segment. Copy the segment with the direct selection tool and paste in front.
You now have something that looks like a knot. You might notice, however, that the ends of the segments are visible. To hide the ends, you can round them off.
- Select each of the line segments you just created (use the Selection tool -- the black arrow -- for this, or just click on each segment in the Layer window).
- Highlight the top path (the pink one) in the Appearance window.
- Click on the Rounded Ends button in the Stroke window.
Voila!

