I spent some time deconstructing Cat's method, and found that it was very similar to the classic looping provisional cast on, the key difference being that you're looping your working yarn around the cable, rather than a length of waste yarn. Kinetically, these methods are very different, but the end result is quite similar. This gave me the idea to try to adapt other provisional cast ons for moebius purposes.
The method described below is adapted from the Turkish Cast On, commonly used for casting on toe-up socks. Turkish cast on is about as simple as you get -- it's just a continuous series of wraps around 2 needle tips. But it gets a little tricky when you adapt it to a moebius. Instead of just holding onto the yarn and wrapping it around and around, you are wrapping it around a cable ring, so you have to reposition your hand with each wrap. But despite this little inconvenience, I find it's the easiest and friendliest moebius cast on.
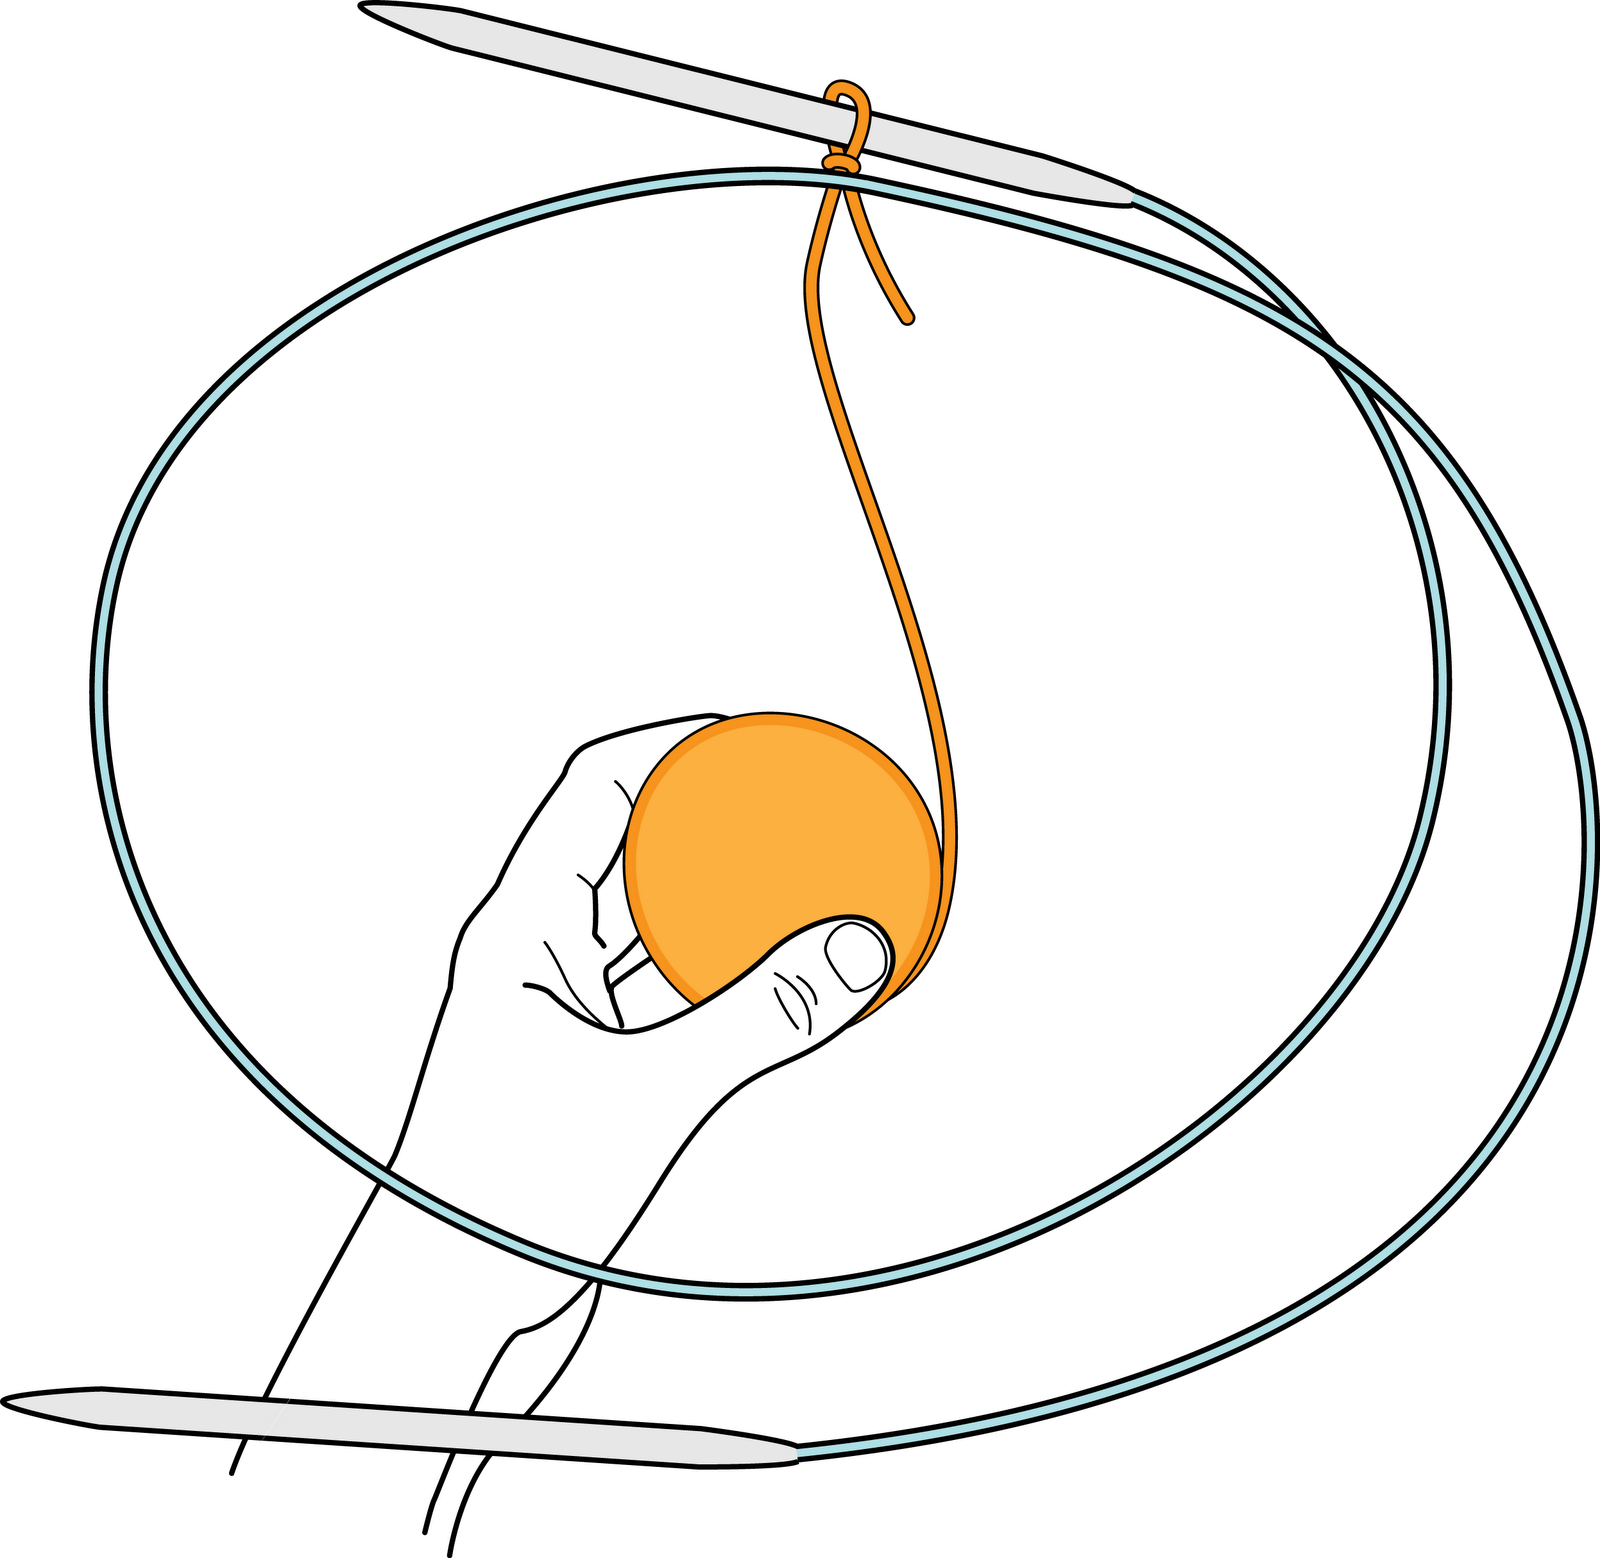
Start with a 40" cable needle.
Step 1
Tie a slip knot into the end of the yarn, and place it on your R needle.
Loop the cable around, and lay it in front of the knot and the working yarn.
Hold the yarn behind the needle and cable.
It should look like this:
Step 2
Release the yarn and move your hand around to the front of the cable.
Step 3
Grasp the ball of yarn from the front of the cable.
Step 4
Holding the yarn, bring your hand above the needle.
Step 5
Bring your hand back down below the needle. Yarn now wraps around the needle and cable.
This is your first Moebius stitch. When counting sts for final width, count this wrap as one stitch.
Repeat steps 2-5 to make more wraps. As you continue to wrap, slide your cast-on stitches to the right, so they slide off the R needle and onto the cables.
By the way, as you slide your wraps onto the cables, do not pull out the extra slack. The wraps need to be loose enough to slide around and onto your other needle.
When you’ve cast on enough sts to go all the way around your cable needle, your work should look something like this. Place a stitch marker on your right needle to indicate your starting point. Work the first stitch on the L needle, indicated with the arrow.
With your stitch marker in place, work the first stitch on the L needle and continue around.
Notice how your slipknot is now on the cable. It started out on the R needle, and as you continued to cast on your moebius stitches, it moved clockwise around your cable to this position.
After you’ve worked all the cast on stitches (once around, or half of 1 moebius round), your slipknot will be on the tip of your L needle, and your stitch marker will be on the cable. Pretty cool, eh?
So, now you know how I like to do it. But if you, like me, are still curious about other ways to cast on for your moebius, here are some links you might find interesting.
Toroidal Snark - sarah-marie belcastro describes a variety of ways for casting on.
Iris Schreier's moebius cast on - video demonstrating an alternative way of casting on -- the result is kindof like Judy's Magic Cast On a-la-moebius.


Thanks, I'm going to try your method it looks good and with those diagrams I think I'll understand it :-) PS: I've used Turkish Cast On to make tiny knitted bags for Blythe dolls
ReplyDeleteWow, it's something new. But i would need another pair of needles for starting to knit.
ReplyDeleteThanks for being so inventive. Just yesterday I cast-on and knitted a moebius cowl. (Used Cat B's for lack of ingenuity and it was amazingly simple!)
ReplyDeleteThis is a great explanation!
ReplyDeleteThanks for posting!
I'll try this method ASAP!!!
just found this blog. Great instructions.
ReplyDeleteMy husband is the expert on the program and
he has done a couple of drawings you may like.
If yes, just email and I will send them.
Again, great site.
Thanks for posting this information. The Illustrator diagrams really help make the process very clear.
ReplyDeleteI found it easier to use a tiny ball of yarn for the cast-on, instead of using the full ball of sock yarn that I started with.
This is awesome. I found it so much easier. Thanks for posting this.
ReplyDeleteThanks so much for posting this! Your pictures really made it easy to follow. I've been intrigued by Möbius patterns, but intimidated by the cast on. Now (tho I'm only two rows in) I think maybe I've got it! Can't wait to start knitting through my stash with möbius patterns.
ReplyDeleteThis looks great! For a left handed knitter, would you reverse the direction of the cast on?
ReplyDeleteI generally do not recommend reversing anything based on handed-ness.
Deletedanke
ReplyDeleteBeen knitting for years and never heard of mobius, please fill me in.
ReplyDeleteI am not proficient in English but , I did understand beautifully everything. You do know how to teach. Thanks.
ReplyDeleteAna Marie Santana. Ecuador.
Thanks for another inventive solution! I'm wondering if the cables have to be exactly the right size for the stitches to fit completely around them, as it looks in your illustration. Or can one needle be pulled out magic loop-style when you begin the knitting? I can't quite picture in my head if that will work.
ReplyDeleteAnswering my own question: I did a test tiny moebius, and magic looping (sorta) works. I have to say moebius circles are not the most fun knitting I ever did, but this method of Jeny's is awesome.
ReplyDeleteBecause I'm lazy, I cut an appropriate length of yarn to do the caston, then joined new yarn to do the actual knitting. I'd rather weave in a couple ends than push a skein of yarn in & out of the circle, but that's just me.
This comment has been removed by the author.
ReplyDeleteSo does this produce an actual moebuis (endless edge) circle or is it just circular knitting?
ReplyDeleteMarg, I'm not sure if you're addressing Jeny or me. Mine did make a moebius (http://www.ravelry.com/projects/jvallas/mobius-with-a-different-start), so I can say Jeny's method does, too, because I used her method.
DeleteGreat illustration and explanation however I am still at a loss as to what a moebious is used for other than something circular, ie. scarves maybe?
ReplyDeleteAnd is a moebious cast on solely for moebius patterns or can it be used as casting for any other patterns and if so, of what benefit is it vs an ordinary cast on, ie long tail cast on for example? This is the first time I have come across knitting a moebious so I am totally ignorant to what it is and for what it is used for. Your help would be much appreciated. Thank you.